Sunday, August 14, 2011

Learning Scheme R6RS Using the DrRacket IDE

“LISP is worth learning for a different reason - the profound enlightenment experience you will have when you finally get it; that experience will make you a better programmer for the rest of your days, even if you never actually use Lisp itself a lot.” – Eric Raymond, How To Become A Hacker

Scheme is a major dialect of the LISP programming language. R6RS is the latest standard of Scheme. DrRacket is a free IDE for Scheme programming. (Racket is an implementation of Scheme, with many of its own dialects). This short tutorial is about using the DrRacket IDE to begin Scheme programming.

My motivation to learn Scheme was to study Structure and Interpretation of Computer Programs. I installed DrRacket and learned Scheme using the excellent and free book The Scheme Programming Language. After that I was able to run examples and to work out exercises from Structure and Interpretation of Computer Programs. It worked out quit well. And I do feel gaining significant insight about programming through those studies.

DrRacket installation is straightforward. Just download the installer and execute it.

DrRacket Workbench

There are two editing panels on the DrRacket workbench. The panel on the top is for function definitions. The panel on the bottom is the Read-Eval-Print Loop (Read-Eval-Print Loop REPL).

Choose A Dialect

DrRacket allows one to use many dialects of Scheme. (In DrRacket’s term, each dialect of Scheme is a “language”). In this tutorial, we are going to use R6RS Scheme.

To let DrRacket know that we are going to use R6RS Scheme, on the DrRacket workbench, select the menu item Language -> Choose Language … A dialog box with the title Choose Language will pop up. On the dialog box, select the radio button with label “use the language declared in the source”, and click the OK button. Then on the top of the upper editing panel, type:
#!r6rs
(import (rnrs base (6)))
Then click the Run button on the tool bar above the upper editing panel to let everything on the upper editing panel “take effect”. (You need to click the Run button once every time you changed the content of the upper editing panel).

 Execute Program in the REPL

Now let's try our first and simplest Scheme program. On the REPL, type
(+ 2 5)

After you hit the Return key, DrRacket evaluates the expression, prints 7 below the expression, and prints the prompt again for you to enter new expression.


Create a Library

Reusable code is organized into libraries. Now we are going to create a simple library.

On the definition editing panel, type the following code fragment

#!r6rs
(library (ted-collection math)
         (export triple)
         (import (rnrs))

         (define (triple x) (* x x x)))

This piece of code
  1. defines a library named ted-collection math
  2. defines a function called triple in the library.  triple takes a parameter and returns the triple value of it as the result. 
  3. exports the function for other code outside the library to use.
Now save the code in a file named math.sls, and store the file under C:/programs/ted-collection. To save the content of the definition editing panel to a file, click the menu item File -> Save Definitions.


Add Library Path to DrRacket

We have to add the path to the library to DrRacket to let it recognize the library.  From the workbench’s menu bar, click the menu item Language -> Choose language … When the dialog box with the title Choose Language pops up, click the Show Details button. Now the dialog box will look like the snapshot below. The portion of the dialog to add collection paths is marked out in the snapshot. Add path C:/programs to the Collection Paths.


Use a Library

Now we are going to use the library that we just created.  On the definition editing panel, type

#!r6rs
(import (rnrs base (6))
        (ted-collection math))

And hit the Run button.

On the REPL, type

(triple 9)

After hit the Return button, the REPL will show the result, 27.


The import expression imports two libraries. One is the library that we just created, another is the library that implements R6RS base features in DrRacket (as a Racket module). When you explore more features of R6RS Scheme, you may need to import more such libraries that implemented more advanced R6RS Scheme features in DrRacket. You can find all those Racket modules that implement R6RS in DrRacket under $Racket-Installation-Home/collects (substitute $Racket-Installation-Home by the actual directory where you installed Racket). (import (rnrs base (6))) imports the module stored in file rnrs/base-6.rkt). To import rnrs/io/ports-6.rkt, use (import (rnrs io ports (6))).

Wednesday, August 10, 2011

Using GreasyMonky and jQuery to Help Automated Web Tests

Automated web testing with Watir, Selenium, etc. are very popular in Agile software development. The tests programmatically check web pages to see whether they are as expected. The tests should pass when the web pages are as expected and fail when they are not. When develop such tests, we frequently need purposely making the web pages under test “incorrect” to see whether our tests really catch them. If the pages are dynamically generated via certain server-side programs using JSP, servlet, etc., the costs, in term of development time, to vary them are fairly high.

It will cost much less in time to vary web pages via Greasemonky scripts than changing JSP pages, servlets, etc. Besides, if the changes are done in JSP pages, servlets, etc. just to check our tests, we have to undo the changes aftermath.It will cost additional development time.

Greasemonky is a Firefox add-on. Greasemonky user scripts are JavaScripts. This article uses Greasemonky 0,9,8 in Firefox 5.0.1 as example.

Once Greasemonky is installed into Firefox, a Greasemonky icon will appear at the upper-right corner of the browser. Clicking the button beside the icon will pop up a menu with the following items:
  • Enabled (to enable or disable Greasemonky)
  • Manage user scripts …
  • New user script …
Creating Greasemonky User Scripts

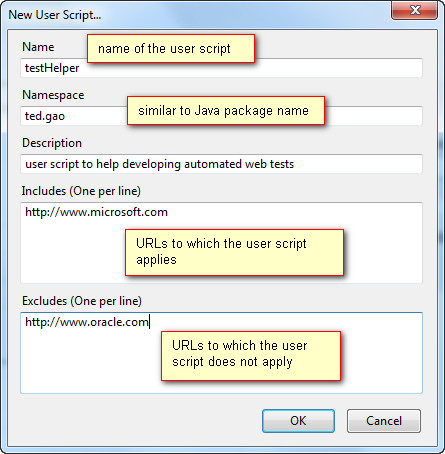
To create a new user script, select the menu item “New user scripts…” from the Greasemonky menu. A New User Script… dialog will pop up. Fill it and click the OK button.

Editing Greasemonky User Scripts
To manage existing user scripts, select the menu item “Manage user scripts …”. It will start a browser tab with all existing user scripts listed on it. One can disable or remove a particular user script by clicking the Disable or Remove button for that user script. To edit a user script, right click the item representing it on the tab and select menu item Show container folder from the context menu. It will bring in a Windows Explorer window with the user script in the opened folder. In our example, the user script is named testHelper and the script file name will be given by Greasemonky as testhelpr.user.script. One can open the script file with any text editor and edit it.

In our example, our script is as below.

// ==UserScript==
// @name           testHelper
// @namespace      ted.gao
// @description    jQuery script to help automated web testing
// @include        http://www.google.com/
// @require       http://ajax.googleapis.com/ajax/libs/jquery/1.6.2/jquery.min.js
// ==/UserScript==

$("html body div#mngb div#gb div#gbw div#gbz ol.gbtc li.gbt a#gb_2.gbzt span.gbts").text("Pictures");
$("html body div#searchform.jhp form#tsf div.tsf-p div.jsb center input").remove()

What between the // ==UserScript== and // ==/UserScript== lines are Greasemonky metadata block. What after the  // ==/UserScript== line are ordinary JavaScript. In our case, the JavaScripts are two jQuery statements. To enable jQuery in Greasemonky, one only needs to have the metadata line 
// @require       http://ajax.googleapis.com/ajax/libs/jquery/1.6.2/jquery.min.js

With the user script testHelper as in the example above, when we visit Google home page, the page will be altered as shown here.


Original Google Home Page


Altered


Tuesday, August 9, 2011

Inheritance and Overriding in Maven

Maven provides a mechanism for a project to inherit project information from its parent project. Information that a project can inherit from its parent project include:
  • Dependencies under <dependencies>
  • Dependencies under <dependencyManagement>
  • Properties under <properties>
  • Plugin list and configurations
  • And so on …
 Of course, all inherited information can be overridden. For example, declaring a property named version in a project itself will override the same property inherited from its parent project.

Any Maven configuration may have property references, in the form of ${property-name}, in it. An interesting question is: when a property is overridden, are all other inherited configurations with ${the-property-name} in them effectively different between the child and the parent, depending on the value of that property for each of them?

The issue can be illustrated with an example. In this example, there are two sibling projects A and B, both have project P as their parent. In project P’s POM file, there is a property named development.team, and a configuration of the Maven jar plug-in as described in the following POM fragment:
...
<properties>
    ...
    <development.team>tiger</development.team>
    ...
</properties>
...
<plugins>
    <plugin>
        <groupId>org.apache.maven.plugins</groupId>
        <artifactId>maven-jar-plugin</artifactId>

        <configuration>
            <archive>
                ...
                <manifestEntries>
                    <development-team>${development.team}</ development-team >
                </manifestEntries>
            </archive>
        </configuration>
    </plugin>
<plugins>

The configuration of Maven jar plugin will let Maven to write an entry named development-team into the manifest file for the jar file built out of the project associated with the POM. The entry may look like:

Development-team: tiger

In our example, both project A and B are jar packaging project. Both project A and B inherited the property and plugin configuration from project P. Project A, however, overrides the property with the following POM fragment in its own POM:
<properties>
    <development.team>wolf</development.team>
</properties>

Here comes our question. What will shows up as development-team in the manifest files in the jar files built out of project A and B.  A reasonable expectation, in the spirit of Open-Close principle, is that it is wolf for A, and tiger for B. Is it the way of Maven? I searched Maven documents but could not find a specification in this aspect. So I did an experiment and found that Maven does work this way.