Eclipse is the most popular IDE in Java programming. It is also a great IDE in Scala programming. sbt is the default build tool for Scala projects, like Maven for Java projects. sbt brings the following benefits (among others):
- Easy management of third-party libraries (inside and outside Eclipse)
- Easy execution of all tests
- Easy packaging of artifacts
This tutorial teaches how to use Eclipse and sbt together. It is assumed that the readers are Windows users.
Download and Install Eclipse
Download Eclipse Classic 4.2.1. Unzip it to a directory in your PC file system. That is all about Eclipse installation. To start Eclipse, double click eclipse.exe (it is under the eclipse directory).
Create an Eclipse workspace Directory
Simply create an ordinary directory, for example, C:\eclipse-4.2-workspace. Eclipse workspaces are major version specific. It means that you cannot use the same workspace with Eclipse 3.6 and 3.7. 3.6 and 3.7 are two different major versions. On the other hand, it is OK to use the same workspace for both 3.6.1 and 3.6.2. They are two different minor versions, but are still of the same major version (i.e. 3.6). For this reason, I like to put the Eclipse major version number in my workspace names.
Start Eclipse in the Workspace
Start Eclipse. When asked to select a workspace, select the desired workspace directory, e.g. C:\eclipse-4.2-workspace.
Install the Scala-IDE plugin
Scala-IDE is a plugin in Eclipse to develop Scala projects. To install it, with an Eclipse IDE started, click the Help menu and the Install New Software... menu item. On the Install dialog, click the Add button. On the Add Repository dialog, put in "Scala IDE" for the name field, and http://download.scala-ide.org/sdk/e38/scala210/dev/site/ for the location field.
It will enable Eclipse to work with Scala 2.10.0.
Download and Install sbt
Download sbt.zip and unzip it to your file system. Add the bin directory to your path environment variable.
Add sbteclipse to sbt
sbteclipse is a plugin in sbt to work with Eclipse. Go to the .sbt/plugins directory under your home directory, e.g. C:\Users\ted (for Windows 7). If the directory does not exist, create it. Find a file named plugins.sbt. If it does not exist, create it. Add the following line into it:
addSbtPlugin("com.typesafe.sbteclipse" % "sbteclipse-plugin" % "2.1.1")
It will add the sbteclipse plugin version 2.1.1 into sbt.
Create a sbt Project
Under C:\learning, create a directory usesbt. It will be the project base directory. Under the usesbt directory, create a text file build.sbt, with the following content:
name := "SBT Learning"
version := "1.0"
scalaVersion := "2.10.0"
libraryDependencies += "joda-time" % "joda-time" % "2.1" withSources()
libraryDependencies += "org.joda" % "joda-convert" % "1.2" withSources()
Note that there is a blank line between any two code lines.
For people unfamiliar with SBT, here is detailed explanation:
name := "SBT Learning" - The name of this project is "SBT Learning
version := "1.0" - The project version is 1.0
scalaVersion := "2.10.0" - This project uses Scala version 2.10.0
libraryDependencies += "joda-time" % "joda-time" % "2.1" withSources() - to add a third-party library joda-time (groupId: joda-time, artifactId: joda-time, version: 2.1) to our project. SBT will also download the source code for joda-time 2.1 to our local cache (located under ${USER-HOME}\.ivy2, where ${USER-HOME} is a place holder for the user's home directory, e.g. C:\users\ted, on a Windows 7 PC)
libraryDependencies += "org.joda" % "joda-convert" % "1.2" withSources() - to add a third-party library joda-convert (groupId: org.joda, artifiactId: joda-convert, version: 1.2) to our project. joda-convert 1.2 is required for Scala programs that use joda-time 2.1.
Open a command window, cd into the usesbt directory. Run command sbt. You will see the following command output:
[info] Loading global plugins from C:\Users\ted\.sbt\plugins
[info] Set current project to SBT Learning (in build file:/C:/learning/usesbt/)
>
The > shows that you are in the sbt interactive shell.
In the sbt shell, run command eclipse. You will see something like below in the command window:
> eclipse
[info] About to create Eclipse project files for your project(s).
[info] Updating {file:/C:/learning/usesbt/}default-1d1d75...
[info] Resolving org.scala-lang#scala-library;2.10.0 ...
[info] Resolving joda-time#joda-time;2.1 ...
[info] Resolving org.joda#joda-convert;1.2 ...
[info] downloading http://repo1.maven.org/maven2/joda-time/joda-time/2.1/joda-time-2.1-sources.jar ...
[info] [SUCCESSFUL ] joda-time#joda-time;2.1!joda-time.jar(src) (2730ms)
[info] downloading http://repo1.maven.org/maven2/joda-time/joda-time/2.1/joda-time-2.1.jar ...
[info] [SUCCESSFUL ] joda-time#joda-time;2.1!joda-time.jar (2309ms)
[info] downloading http://repo1.maven.org/maven2/org/joda/joda-convert/1.2/joda-convert-1.2.jar ...
[info] [SUCCESSFUL ] org.joda#joda-convert;1.2!joda-convert.jar (296ms)
[info] downloading http://repo1.maven.org/maven2/org/joda/joda-convert/1.2/joda-convert-1.2-sources.jar ...
[info] [SUCCESSFUL ] org.joda#joda-convert;1.2!joda-convert.jar(src) (608ms)
[info] Done updating.
[info] Successfully created Eclipse project files for project(s):
[info] SBT Learning
>
Import a sbt Project into Eclipse
Now back to Eclipse. Click the File | Import... meu item.
On the Import dialog, select General | Existing Projects into Workspace. Click the Next button. Select C:\learning\usesbt as the root directory. Click the Finish button.
Now you have a corresponding Eclipse project in the IDE. And you are ready to program in Eclipse.
Programming in Eclipse
Switch to the Scala perspective.
Create a simple Scala program that uses joda-time as in Listing-1.
Listing-1 - A Simple Scala Program
package jodatime.example

import org.joda.time.DateTime

object UseJodaTime extends App {
    println(new DateTime)
}
To run the Scala program, open it on the Editor; right click the editor and, from the context menu, select Run As | Scala Application. The program will run, and output something like:
2013-02-24T15:58:15.228-05:00
Updating Third-Party Libraries
When you need to add/remove/update third-party libraries, change the build.sbt file. Then in the sbt interactive shell, run command reload and eclipse. At last, in Eclipse, right click the project in Package Explorer, and click Refresh from the context menu.
Attach Third-Party Library Source
If you want to look into the source code of or debug through a third-party library, you need to attach its source code to the library. To attach the source code of the joda-time library, do the following:
- On Eclipse Package Explorer, right click the SBT Learning project, and from the context menu, select Properties.
- On the Properties for SBT Learning dialog, select Java Build Path from the left pane, and the Libraries tab on the right. Select the Source attachment node under joda-time-2.1.jar, click the Edit ... button. See Figure 1 Attach Library Source Code below
- On the Source Attachment Configuration dialog, select the External Location radio button, and click the External File button, browse the file system to select ${USER-HOME}\.ivy2\cache\joda-time\joda-time\srcs\joda-time-2.1-sources,jar, where ${USER-HOME} is a place holder for the user's home directory. ...and click the OK button. See Figure 2 Select The Path to The Source Code below.
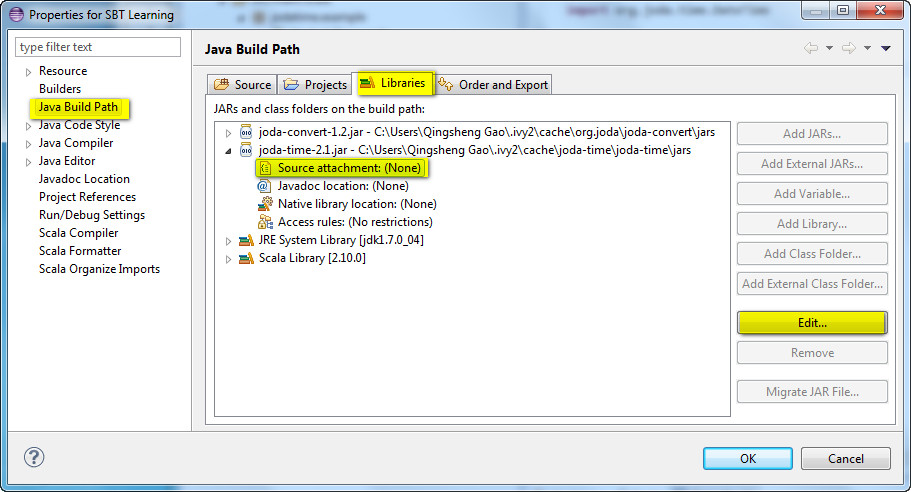 |
| Figure 1 Attach Library Source Code |
 |
| Figure 2 Select The Path to The Source Code |