Saturday, March 30, 2013

Best Practices in Java Exception Throwing, Handling, and Logging

Overview

Exception Related Terminology

In an object-oriented program language such as Java, C#, and JavaScript, an exception is an object that represents an abnormal event. When one method (caller) calls another method (callee), they may communicate about what happened via an exception:
  1. A method may throw an exception to let its caller know that an abnormal event occurred. We call it exception throwing. 
  2. A method may propagate an exception thrown by its callee to its own caller by declaring that exception in its throws clause of method declaration.
  3. A method may translate an exception thrown by its callee into another exception, and throw the new exception (to its own caller)
  4. A method may catch an exception thrown by, or propagated from, its callee, or an exception thrown by it. When a method catches an exception, it may do something in response to the exception. Doing something in response to an exception is called exception handling.
If an exception goes through the main method of a Java or C# program, the program crashes.

Why Throw and Handle Exception

Essentially, a method throws or propagates an exception to its caller to let it know something is wrong, and let the caller know it is time for it to do something to help (i.e. to handle the exception).
Obviously, in almost all cases, it is beneficial to handle exceptions to avoid:
  1. Program crashing
  2. Data corruption
  3. Resource hugging – hugging threads, unclosed database connections, unclosed socket connections, leaked memory, etc.
  4. No response or meaningless response to end users
  5. Any other ways to leave all or part of a system in invalid states.

Exception Throwing

Don’t Throw Exception When Nothing is Abnormal

Exception is supposed to be used to alert one’s caller that something is wrong and the caller should go through an exceptional flow path to handle it. Throwing an exception when nothing is abnormal just like raising fire alarm when you only try to tell your colleague that you need his/her help to make a copy. It works, but is wrong, confusing normal conditions with exceptional conditions. An exception handling flow path is not just another path. It costs much more in CPU time and other resources. It also confuses reader of the code, making it harder to see what the code really intents to do.

For more discussion, please see Item 57: Use exceptions only for exceptional conditions in Chapter 9. Exceptions in Joshua Bloch’s Effective Java, Second Edition.

Do Throw Exception When Something is Abnormal

In a programming language that does not have the exception support (i.e. the try/catch/finally construct), people tend to overload procedure (function, subroutine, method, etc) output (function return or output parameter) with error code. In such practice, certain values of the output are going to be interpreted as normal output and others as error code. There are many disadvantages in such practice:
  • It is more difficult to understand the procedures with output overloading of error code
  • The caller (client) must explicitly check the output to determine its appropriate response
  • Client code that handles the normal case and exception/error case tends to mingle together
The exception support in modern programming languages is just to overcome above problems. When we programming in a modern programming language, we should take advantage of its exception support and throw exception when something is abnormal.

Avoid Triggering Exception

When one (method) calls another method, the caller should be coded in such a way to avoid triggering exceptions thrown by the callee. If the callee does not throw exceptions, the caller don’t have to handle them, to propagate them, or to translate them. Following are ways to avoid triggering exceptions:
  • To avoid NullPointException,  make sure that an object is not null before invoke a method on it.
  • To avoid ClassCastException,  check type of the class to be casted using the instanceof operator before casting.
  • To avoid IndexOutOfBoundsException,  check the length of the array before trying to work with an element of it.
  • To avoid ArithmeticException, make sure that the divisor is not zero before computing the division.
In addition, frequently, a callee throws exception because arguments passed to it are not valid. To remedy such trouble, there should be good document about the callee in regard to what are valid arguments to it, and the caller should ensure the arguments are valid before pass them to the callee.
Similarly, end user input should be validate as early as possible, and the program should raise flag with sufficient information to the user as early as possible given certain user input are invalid rather than allowing the invalid input propagate down the stream further. The farther where a symptom shows up away from the root cause (here invalid user input), the harder to identify the real cause.

Checked or Unckecked Exception 

When one method throws an exception, that exception can be either a check exception or an unchecked exception. An exception that directly or indirectly extends java.lang.RuntimeException is an unchecked exception. An exception that directly or indirectly extends java.lang.Exception but not java.lang.RuntimeException is a checked exception. When one method throws a checked exception, it is mandatory for its caller to either catch the exception or propagates it to its own caller. All checked exception that a method may throw must appear in the throws clause of the method’s API. Initially it was thought best practice to only use checked exception because the benefits of easily seeing what exceptions can be thrown by a method and forcing the method’s callers to handle (or propagate) the exception. After many years of practices, a lot of Java programmers, include Joshua Bloch, Rod Johnson, and Bruce Eckel, came to realize that frequently a caller cannot really do much in handling exceptions thrown by its callee but is forced to have a certain amount of code to get around the mandatory. It costs developers’ time to add that code that doesn’t really do anything useful but clusters the code and confuses readers.

In short, my recommendation on determining between throwing checked or unchecked exception is as following:
  • A method should throw a checked exception when it can reasonably expect the caller to do something to recover from the exception.
  • A method should throw an unchecked exception when it can reasonably assumes the caller cannot do anything to recover from the exception
For more discussion on this issue, please see Item 58: Use checked exceptions for recoverable conditions and runtime exceptions for programming errors and Item 59: Avoid unnecessary use of checked exceptions in Chapter 9. Exceptions in Joshua Bloch’s Effective Java, Second Edition.

The IBM DeveloperWorks article Java theory and practice: The exceptions debate also provides a summary of the checked v.s. Unckecked exception debates.

Exceptions Should Be In Terms of Caller’s Perspective

The purpose for a method to throw an exception is to let the caller know that something abnormal occurred. That something must be in the caller’s perspective, in other words, at the same abstraction level as other things in the implementation of the caller. For example, I am using a computer. In this case, I am the caller and the computer the callee. I “call” the computer to do many useful things for me. If suddenly the computer, instead of doing something I expected, shows me some message like F^&*(%$HNBVFER2U74^$4, I won’t have any clue about what is going on and what I should do in response. If, instead, the error message is “The second RAM module is corrupted”, then I know much better what is going on and what I should do in response. The first error message may mean something tor an electronics engineer specialized in RAM but is not at the level of abstractions known by an ordinary computer user.

For more discussion on this issue, please see Item 61: Throw exceptions appropriate to the abstraction in Chapter 9. Exceptions in Joshua Bloch’s Effective Java, Second Edition.

Exception Message

When one creates a new exception object, one passes a string message into the constructor. The message can be retrieve later to gain helpful information. It helps to have adequate information in the message to be written into log file and to help developers and administrators to reproduce and diagnose the exception later. Please note that such message is normally not for the caller to use because it is normally in natural language and it is hard for the caller (a program module) to understand.

For more discussion on this issue, please see Item 63: Include failure-capture information in detail messages in Chapter 9. Exceptions in Joshua Bloch’s Effective Java, Second Edition.

Document Exceptions Thrown in Javadoc

For each method that throws checked exceptions, in its Javadoc, document each exception thrown with a @throws tag, including the condition under which the exception is thrown.

For more discussion on this issue, please see Item 62: Document all exceptions thrown by each method in Chapter 9. Exceptions in Joshua Bloch’s Effective Java, Second Edition.

Exception Handling


When an exception is thrown by a method itself or its callee, the method may have to do one or more of the following to handle the exception:
  1. Do something to recover completely from the exception so its own caller does not have to notice the occurrence of the exception. It is ideal but rare.
  2. If the method cannot completely recover the system from the exception, do as much as possible to bring the system into a consistent state or roll it completely back to the original state, including release resources held for those operations that triggered the exception.
  3. If it is beneficial for its own caller to know the occurrence, it can re-throw the same exception, or wrap it in another exception and throws it as long as it is more appropriate. It is appropriate when the new exception can help its own caller to know better what happened from the caller’s perspective. Use Java 1.4 exception chaining mechanism to preserver root exception information.
  4. When it may help developers and system administrators on further investigating an exception and fixing the problem offline, log the exception, with stack trace, exception message,  and as much as possible details of the context (largely the state of “this” object and parameters to “this” method) where the exception is thrown by its callee or it. Most time, it is beneficial to do both logging and translation/wrapping (or re-throwing).

At lease a method at the top of the calling stack in that thread should log the exception to one or more log files. Usually only the method at the top of a calling stack in a particular thread should be allowed to halt the thread.

Recovering from Exceptions

In some cases, a method may recover from an exception. For example, inside a method, a trial has been made to open a network socket and an exception has occurred indicating that no socket could be opened. More trials can be made. If the later trial succeeded, the method recovered from its exception, and its own caller does not need to know the occurrence of the exception.

Mitigating Exception Impacts

In some cases, a method cannot completely recover from an exception. In such cases, the method should do as much as possible to:
  1. Bring the system into consistent state or the original state, so the system can keep running without corrupting data and late operations
  2. Release resources hold for the operations that triggered the exception. For example, in case of database exception, close the database connection to prevent database connection leaks. Other possible resources leaks are file handler leaks, socket leaks, memory leaks, etc. See more in the Release Resource in finally Block sub-section below. In such cases, most likely, the method should also need to let its own caller know the occurrence of the exception in order for its own caller to do its own share. If the original exception is equally at the same abstraction level of its own caller, re-throw the same exception. Otherwise, wrap the original exception into another exception that is at the abstraction level of its own caller and throw the other exception. Use Java 1.4 exception chaining mechanism to preserver root exception information.
For more discussion on this issue, please see Item 64: Strive for failure atomicity in Chapter 9. Exceptions in Joshua Bloch’s Effective Java, Second Edition.

Release Resource in finally Block

In case that a method needs to release resources hold no mater exceptions are thrown or no, release the resources in the finally block of try/catch/finally construct. The finally block will be executed no matter the method finishes normally or with exception.


No Blank Catch Clause

In general, it is a very bad practice to have blank catch clause for exceptions. A blank catch clause does not really recover or mitigate an exception but prevents other from doing so. Only for rare cases, such practice is acceptable. Acceptable cases are:
  • exception during close JDBC ResultSet, Statement, and database connection
  • exception during close file, input or output stream, network socket
  • InterrupedException during thread sleeping

Example:
try {
    Thread.sleep(1000);
} catch (InterruptedException ex) {
    // log the exception as a warning
}

Even in those cases, it is better to log the exception for later investigation.

For more discussion on this issue, please see Item 65: Don't ignore exceptions in Chapter 9. Exceptions in Joshua Bloch’s Effective Java, Second Edition.

Exception Logging


Exception logging is for developers and system administrators to diagnosis the root problems and fix them. The logged information will be used offline. It is different from exception recovering and mitigating, which are done at runtime. Exceptions may be caused by incorrect user input or actions. There is almost nothing for developers and system administrators to do to fix the problems. Logging for such exceptions are not needed. Exceptions may be caused by limitations of system or network capacity, or problems of external systems. Logging such exceptions may help system administrators to have better idea about the capacity limitations and to plan for adding resources, or to communicate the problem with others who have control on the external systems. Exceptions may be caused by bugs in our own systems. Logging such exceptions is very helpful for developers to diagnose the root causes and fix them.

When log exception, try to include as much as possible information about the exceptions, include
  • Stack trace
  • Exception message
  • Data in the context – such as parameters to a certain method, state of a certain class.
  • All above for the nested exception, recursively.

Exception and Message to End User


Since every software application system is ultimately to server our end users, it is beneficial to think exceptions from the end users’ perspective. An exception means something is wrong. From an end user’s perspective, ultimately there are only two kinds of exceptions: user exceptions and system exceptions. A user exception is caused directly by a user with invalid input or incorrect action. End users are interested in this kind of exceptions because, if being informed, they can do something to correct them. For this kind of exceptions, the applications should provide enough information about the exceptions and hints to correct them to the end users, and should provide them the second chance to try. For on-line system, the system does not have to log such exceptions. For batch programs, such exceptions should be written into log files for end users, not for developers and system administrators, to read. System exceptions are not user-related, caused by bug in the application code, corrupted data in database, ill database management systems, ill network communication, or other external systems, etc. In short, they have nothing to do with what the end users have done and the end users can do nothing to correct them. All end users have to know about this kind of exceptions is that they occurred, no more details, particularly, not stack trace. Such exceptions have to be written into log files with as much as possible details for developers and system administrators to investigate. Stack trace of the exceptions should be included in the log files. Eventually, the thread in which a system error occurs should halt, with a brief message to the end user and a detail message in one or more log files for developers and system administrators.
It helps to have two top-level java exceptions for a system:  UserException and SystemException. Every thread started by our systems has to handle, at the top of the calling stack, these two kinds of exceptions if present.

Keep any information that might comprise security of the system out of message to end users.
It helps not to hard code message to end user in programming code. Instead, keep them in certain configuration files, such as Java properties file.

Don’t Create Custom Exception Unnecessarily

If possible, try to use exceptions in stand JDK, well-established libraries or framework, rather than create new custom exception. When a new custom exception is created, it takes time for other people to learn it. It also increases the size of our source code. Doing so only when it brings true benefits that existing exception classes cannot bring.

For more discussion on this issue, please see Item 60: Favor the use of standard exceptions in Chapter 9. Exceptions in Joshua Bloch’s Effective Java, Second Edition.

Saturday, February 23, 2013

Using Eclipse and sbt in Scala Programming

This is a tutorial on using the Eclipse IDE and the sbt build tool in Scala programming.

Eclipse is the most popular IDE in Java programming. It is also a great IDE in Scala programming. sbt is the default build tool for Scala projects, like Maven for Java projects. sbt brings the following benefits (among others):
  • Easy management of third-party libraries (inside and outside Eclipse)
  • Easy execution of all tests
  • Easy packaging of artifacts
Eclipse's built-in third-party library management is inconvenient. My other article discussed this issue.

This tutorial teaches how to use Eclipse and sbt together. It is assumed that the readers are Windows users.

Download and Install Eclipse

Download Eclipse Classic 4.2.1. Unzip it to a directory in your PC file system. That is all about Eclipse installation. To start Eclipse, double click eclipse.exe (it is under the eclipse directory).

Create an Eclipse workspace Directory

Simply create an ordinary directory, for example, C:\eclipse-4.2-workspace. Eclipse workspaces are major version specific. It means that you cannot use the same workspace with Eclipse 3.6 and 3.7. 3.6 and 3.7 are two different major versions. On the other hand, it is OK to use the same workspace for both 3.6.1 and 3.6.2. They are two different minor versions, but are still of the same major version (i.e. 3.6). For this reason, I like to put the Eclipse major version number in my workspace names.

Start Eclipse in the Workspace

Start Eclipse. When asked to select a workspace, select the desired workspace directory, e.g. C:\eclipse-4.2-workspace.

Install the Scala-IDE plugin

Scala-IDE is a plugin in Eclipse to develop Scala projects. To install it, with an Eclipse IDE started, click the Help menu and the Install New Software... menu item. On the Install dialog, click the Add button. On the Add Repository dialog, put in "Scala IDE" for the name field, and http://download.scala-ide.org/sdk/e38/scala210/dev/site/ for the location field.

 It will enable Eclipse to work with Scala 2.10.0.

Download and Install sbt

Download sbt.zip and unzip it to your file system. Add the bin directory to your path environment variable.

Add sbteclipse to sbt

sbteclipse is a plugin in sbt to work with Eclipse. Go to the .sbt/plugins directory under your home directory, e.g. C:\Users\ted (for Windows 7). If the directory does not exist, create it. Find a file named plugins.sbt. If it does not exist, create it. Add the following line into it:

addSbtPlugin("com.typesafe.sbteclipse" % "sbteclipse-plugin" % "2.1.1")

It will add the sbteclipse plugin version 2.1.1 into sbt.

Create a sbt Project

Under C:\learning, create a directory usesbt. It will be the project base directory. Under the usesbt directory, create a text file build.sbt, with the following content:

name := "SBT Learning"

version := "1.0"

scalaVersion := "2.10.0"

libraryDependencies += "joda-time" % "joda-time" % "2.1" withSources()

libraryDependencies += "org.joda" % "joda-convert" % "1.2" withSources()

Note that there is a blank line between any two code lines.

For people unfamiliar with SBT, here is detailed explanation:

name := "SBT Learning"  - The name of this project is "SBT Learning
version := "1.0" - The project version is 1.0
scalaVersion := "2.10.0" - This project uses Scala version 2.10.0
libraryDependencies += "joda-time" % "joda-time" % "2.1" withSources() -  to add a third-party library joda-time (groupId: joda-time, artifactId: joda-time, version: 2.1)  to our project. SBT will also download the source code for joda-time 2.1 to our local cache (located under ${USER-HOME}\.ivy2, where ${USER-HOME} is a place holder for the user's home directory, e.g. C:\users\ted, on a Windows 7 PC)
libraryDependencies += "org.joda" % "joda-convert" % "1.2" withSources() - to add a third-party library joda-convert (groupId: org.joda, artifiactId: joda-convert, version: 1.2) to our project. joda-convert 1.2 is required for Scala programs that use joda-time 2.1.

Open a command window, cd into the usesbt directory. Run command sbt. You will see the following command output:

[info] Loading global plugins from C:\Users\ted\.sbt\plugins
[info] Set current project to SBT Learning (in build file:/C:/learning/usesbt/)
>

The > shows that you are in the sbt interactive shell.

In the sbt shell, run command eclipse. You will see something like below in the command window:

> eclipse
[info] About to create Eclipse project files for your project(s).
[info] Updating {file:/C:/learning/usesbt/}default-1d1d75...
[info] Resolving org.scala-lang#scala-library;2.10.0 ...
[info] Resolving joda-time#joda-time;2.1 ...

[info] Resolving org.joda#joda-convert;1.2 ...
[info] downloading http://repo1.maven.org/maven2/joda-time/joda-time/2.1/joda-time-2.1-sources.jar ...
[info]  [SUCCESSFUL ] joda-time#joda-time;2.1!joda-time.jar(src) (2730ms)
[info] downloading http://repo1.maven.org/maven2/joda-time/joda-time/2.1/joda-time-2.1.jar ...
[info]  [SUCCESSFUL ] joda-time#joda-time;2.1!joda-time.jar (2309ms)

[info] downloading http://repo1.maven.org/maven2/org/joda/joda-convert/1.2/joda-convert-1.2.jar ...
[info]  [SUCCESSFUL ] org.joda#joda-convert;1.2!joda-convert.jar (296ms)
[info] downloading http://repo1.maven.org/maven2/org/joda/joda-convert/1.2/joda-convert-1.2-sources.jar ...
[info]  [SUCCESSFUL ] org.joda#joda-convert;1.2!joda-convert.jar(src) (608ms)

[info] Done updating.
[info] Successfully created Eclipse project files for project(s):
[info] SBT Learning
>


Import a sbt Project into Eclipse


Now back to Eclipse. Click the File | Import... meu item.

On the Import dialog, select General | Existing Projects into Workspace. Click the Next button. Select C:\learning\usesbt as the root directory. Click the Finish button. 

Now you have a corresponding Eclipse project in the IDE. And you are ready to program in Eclipse.

Programming in Eclipse

Switch to the Scala perspective.

Create a simple Scala program that uses joda-time as in Listing-1.


Listing-1 - A Simple Scala Program
 
package jodatime.example

import org.joda.time.DateTime

object UseJodaTime extends App {  
    println(new DateTime)
}

To run the Scala program, open it on the Editor; right click the editor and, from the context menu, select Run As | Scala Application. The program will run, and output something like:

2013-02-24T15:58:15.228-05:00

Updating Third-Party Libraries

When you need to add/remove/update third-party libraries, change the build.sbt file. Then in the sbt interactive shell, run command reload and eclipse. At last, in Eclipse, right click the project in Package Explorer, and click Refresh from the context menu.

Attach Third-Party Library Source

If you want to look into the source code of or debug through a third-party library, you need to attach its source code to the library. To attach the source code of the joda-time library, do the following:

  1. On Eclipse Package Explorer, right click the SBT Learning project, and from the context menu, select Properties.
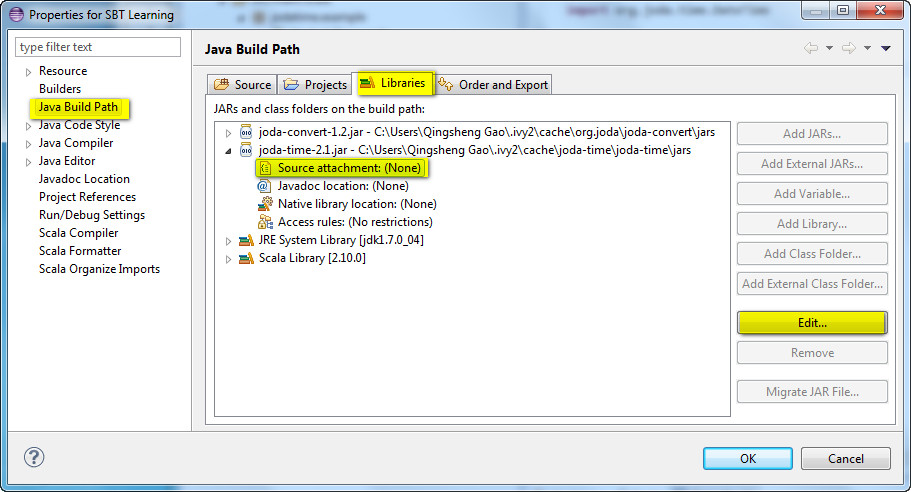
  2. On the Properties for SBT Learning dialog, select Java Build Path from the left pane, and the Libraries tab on the right. Select the Source attachment node under joda-time-2.1.jar, click the Edit ... button. See Figure 1 Attach Library Source Code below
  3. On the Source Attachment Configuration dialog, select the External Location radio button, and click the External File button, browse the file system to select ${USER-HOME}\.ivy2\cache\joda-time\joda-time\srcs\joda-time-2.1-sources,jar, where ${USER-HOME} is a place holder for the user's home directory. ...and click the OK button. See Figure 2 Select The Path to The Source Code below.
Figure 1 Attach Library Source Code
Figure 2 Select The Path to The Source Code

Monday, February 18, 2013

Dissection of URL of HTTP Requests in Java Web Applications

Java web applications are request-driven. A client (i.e. a web browser) sends a HTTP request to a server (e.g. Tomcat) and gets a HTTP response back, and displays content of the response. Every HTTP request has a URL. This article is a brief explanation of the structure of such URLs.

Overview

A typical HTTP request URL is like: http://www.mycompany.com/my-web-appliction/my-servlet?param1=value1&param2=value2

It begins with "http" or "https" - the request protocol.

In above example, www.mycompany.com is the full host name of the server. The place can also been taken by the IP address of the server. If the protocol is http but the server port is not 80 (or the protocol is https but the server port is not 443), the port number has to be appended to the host name, like in www.mycompany.com:8080. Here 8080 is the server port.

In above example,  my-web-appliction is the context root of the web application. The way to specify the context root of a web application depends on the application server (e.g. WebLogic server). More details on this will come later.

In above example, my-servlet is the servlet URL. A servlet's URL is specified in the web.xml file for the web application (every servlet is declared in a web application). Details will come later.

In above example, param1=value1&param2=value2 are the request parameters. They are name/value pairs. Withing a pair, the name and value are separated by =, and pairs are separated by & (or ;). In this example, there are two request parameters, named param1 and param2, and their value are respectively value1 and value2. In a generic HTTP URL, this part is called a query string, and is separated from the main URL by a character ?.

Specifying Context Root of a Web Application  in Apache Tomcat

In Tomcat, the name of the base direction of a web application is the context root. For example, if the base directory of a web application is tomcat/webapps/mywebapp, where tomcat is the installation directory of Tomcat, the context root is mywebapp.


Specifying Context Root of a Web Application in JBoss Server

It is the value of the <module>/<web>/<context-root> element in application.xml.

Specifying Context Root of a Web Application in WebLogic Server

It is the value of the <context-root> element in weblogic.xml for the web applicaiton (i.e. in the same directory as web.xml for the web application)

Specifying Context Root of a Web Application in WebSphere Server

It is the value of the uri attribute of the <context-root> element in the ibm-web-ext.xml for the web application (i.e. in the same directory as web.xml for the web application)


Specifying  Servlet URL

An example (partial) web.xml for a web application:

<servlet>
    <servlet-name>the-servlet-name</servlet-name>
    <servlet-class>com.mycompany.XyzServlet</servlet>
</servlet>

<servlet-mapping>
    <servlet-name>the-servlet-name</servlet-name>
    <url-pattern>/my-servlet</url-pattern> 
</servlet-mapping>


Sunday, December 30, 2012

A Issue with Using db4o in Scala Programs

In the other article I showed that we can use db4o in Scala programs. I also mentioned that there are some limitations: db4o cannot correctly store Scala objects with fields of the type scala.collection.mutable.Map and scala.collection.mutable.Set. This article discuss this issue in detail.

The Scala class Programmer (Listing-1) has a field named skillMap whose type is scalca.collection.mutable.Map. The map is used to record the programmer's skills and respective skill levels.

Listing-1 

package tutorial.db4o

class Programmer (val name: String, var phone: String) {
    private val skillMap = scala.collection.mutable.Map[String, Int]()
    
    def skills = skillMap.keySet
    
    def hasSkill(skill : String) = skills.contains(skill)
    
    def skillLevel(skill: String) : Option[Int] = {
        if (hasSkill(skill)) Some(skillMap(skill))
        else None
    }
    
    def addSkill(skill: String, level: Int) {skillMap(skill) = level}
}

In the program in Listing-2, we create an instance of the Programmer class and store it in the db4o database. In the program in Listin-3, we retrieve the object stored in db4o, and print out the programer's name, phone number, skills and corresponding levels. However, the execution runs into an exception.

Listing-2 - A Program to store an object into db4o

package tutorial.db4o

import com.db4o.Db4oEmbedded
import Adapter._

object AddProgrammers extends App {
    // a connection to the tutorial (db4o) database
    val connection = Db4oEmbedded.openFile("tutorial.db4o")
    
    // create a Programmer instance and store it in the database
    
    val steve = new Programmer("Steve", "513-206-3276")
    steve.addSkill("Java", 6)
    steve.addSkill("Perl", 3)
    connection.store(steve)
    
    connection.commit()
    
    connection.close()
}

Listing-3 - A Program to retrieve an object from db4o

package tutorial.db4o

import com.db4o.Db4oEmbedded
import Adapter._
import com.db4o.query.Predicate

object ReadProgrammers extends App {
    // a connection to the tutorial (db4o) database
    val connection = Db4oEmbedded.openFile("tutorial.db4o")
    
    // Retrieve programmers with the name Steve from the database
    val rs = connection.query{programmer: Programmer => programmer.name == "Steve"}
        
    // Print out each programmer's name, phone number, and skills
    rs.foreach{programmer =>
        println("Programmer name: %s, phone number: %s, skills:".format(programmer.name, programmer.phone))
        programmer.skills.foreach{skill => println("    %s at level %d".format(skill, programmer.skillLevel(skill).get))}
    }
    
    connection.close()
}

Output of execution of the program in Listing-3:

Programmer name: Steve, phone number: 513-206-3276, skills: Exception in thread "main" java.lang.NullPointerException at scala.collection.mutable.HashTable$$anon$1.(HashTable.scala:159) at scala.collection.mutable.HashTable$class.entriesIterator(HashTable.scala:157) at scala.collection.mutable.HashMap.entriesIterator(HashMap.scala:45) at scala.collection.mutable.HashTable$class.foreachEntry(HashTable.scala:190) at scala.collection.mutable.HashMap.foreachEntry(HashMap.scala:45) at scala.collection.mutable.HashMap$$anon$1.foreach(HashMap.scala:99) at tutorial.db4o.ReadProgrammers$$anonfun$2.apply(ReadProgrammers.scala:17) at tutorial.db4o.ReadProgrammers$$anonfun$2.apply(ReadProgrammers.scala:15) at scala.collection.LinearSeqOptimized$class.foreach(LinearSeqOptimized.scala:59) at scala.collection.immutable.List.foreach(List.scala:76) at tutorial.db4o.ReadProgrammers$delayedInit$body.apply(ReadProgrammers.scala:15) at scala.Function0$class.apply$mcV$sp(Function0.scala:34) at scala.runtime.AbstractFunction0.apply$mcV$sp(AbstractFunction0.scala:12) at scala.App$$anonfun$main$1.apply(App.scala:60) at scala.App$$anonfun$main$1.apply(App.scala:60) at scala.collection.LinearSeqOptimized$class.foreach(LinearSeqOptimized.scala:59) at scala.collection.immutable.List.foreach(List.scala:76) at scala.collection.generic.TraversableForwarder$class.foreach(TraversableForwarder.scala:30) at scala.App$class.main(App.scala:60) at tutorial.db4o.ReadProgrammers$.main(ReadProgrammers.scala:7) at tutorial.db4o.ReadProgrammers.main(ReadProgrammers.scala)

Clearly, the Programmer object was not stored correctly in db4o. If we replace the Scala Map by a Java Map (e.g. java.util.HashMap), the programs will work correctly. It is however a awkward work-around to use Java map instead of Scala map in a Scala program.

Sunday, December 23, 2012

Using db4o in Scala Programs

This is a tutorial on using db4o in Scala programs. db4o is an object database management system with both Java and .NET APIs. We can also use db4o in Scala programs (with some limitations) as shown in this tutorial. Scala has many advantages over Java, as also shown in this tutorial. The readers of this tutorial are not assumed to have any knowledge about db4o. However, readers who have experience with Java programs using db4o can appreciate the elegance of Scala over Java more. The readers are expected to have basic knowledge about both Java and Scala programming.

It is a good practice to manage library dependency using Maven. (If you use Eclipse, and are interested in using Maven to manage classpath in Eclipse, you may be interested in this article of mine on this subject.) To manage db4o library dependency using Maven, include the snapshot repository below in the pom.xml file:

<repository>
    <snapshots>
        <enabled>true</enabled>
        <updatePolicy>never</updatePolicy>
        <checksumPolicy>fail</checksumPolicy>
    </snapshots>
    <id>db4o</id>
    <name>DB4O</name>
    <url>http://source.db4o.com/maven</url>
    <layout>default</layout>
</repository>

Also include the following dependency on the db4o-full-java5.jar in the pom.xml:

<dependency>
    <groupId>com.db4o</groupId>
    <artifactId>db4o-full-java5</artifactId>
    <version>8.0-SNAPSHOT</version>
</dependency>

(This tutorial includes both Java and Scala programs. If you use Eclipse and want help on working with Eclipse projects mixing Java and Scala, you may be interested in this article of mine on this subject.)

A Java Program Using db4o 

This tutorial starts with a Java program using db4o, to highlight the advantages of Scala. In Listing 2, the Java program opens a db4o database and retrieves Programmer objects with name "Joe" from it. The Java class Programmer is in Listing 1. A programmer has a name and a phone number. The name is not mutable and the phone number is. The query is awkward because a Java method cannot take another method as parameter so we have to wrap the match method in an anonymous class extending the  Predicate class (Line 12 - 17). The shortcoming can be overcome in Scala programs since Scala is also a functional programming language and can take a function as function parameter.


Listing 1 - The Programmer Java Class 

package tutorial.db4o.java;

public class Programmer {
    private String name;
    public String phone;
    
    public Programmer(String name, String phone) {
        this.name = name;
        this.phone = phone;
    }
    
    public String getName() {
        return name;
    }
}

Listing 2 - A Java Program Using db4o 

package tutorial.db4o.java;

import com.db4o.Db4oEmbedded;
import com.db4o.ObjectContainer;
import com.db4o.ObjectSet;
import com.db4o.query.Predicate;

public class ReadProgrammer {
    public static void main(String[] args) {
        ObjectContainer connection = Db4oEmbedded.openFile("tutorial.db4o");
        
        ObjectSet<Programmer> rs = connection.query(new Predicate<Programmer>() {
            @Override
            public boolean match(Programmer programmer) {
                return programmer.getName().equals("Joe");
            }
        });

    }
}

Adding Scala Objects into db4o 

Now let's look into the Scala world. In Listing 3 is the Scala counterpart of the Java Programmer class. An instance of the Scala class Programmer also has a immutable name and a mutable phone number. It is obvious that the Scala version is much simpler.

Listing 3 - The Scala Class Programmer 

package tutorial.db4o

class Programmer (val name: String, var phone: String)

In Listing 4 is a Scala program that creates three instances of the Programmer class and adds them into the db4o database. A Java version will be similar. There is no advantage in Scala programs over their Java counterparts in regard to storing objects into a db4o database, and deleting them from it.

Listing 4 - Add Objects into a db4o Database
 
package tutorial.db4o

import com.db4o.Db4oEmbedded
import Adapter._

object AddProgrammers extends App {
    // a connection to the tutorial (DB4o) database
    val connection = Db4oEmbedded.openFile("tutorial.db4o")
    
    // create three Programmer instances and store them in the database
    connection.store(new Programmer("Steve", "513-206-3276"))
    connection.store(new Programmer("Bob", "513-376-2521"))
    connection.store(new Programmer("Joe", "513-536-8093"))
    connection.commit()
    
    connection.close()
}

Retrieving Objects from db4o

In Listing 5 is a Scala program that retrieves all programmer instances in the db4o database and prints out their name and phone number. Contrast this program with the one in Listing 2, we can see that the query in the Scala version (Line 11) is much simpler than their Java counterpart (Line 12 - 17). The query method in the Scala version takes an anonymous function as its parameter. The anonymous function, on its turn, takes a Programmer object as its parameter and returns a Boolean value. If it returns true, the programmer object will be included in the query results, or excluded from it if it returns false. In Listing 5, the anonymous function always returns true regardless the programmer object passed in since we want to retrieve all programmer objects in the db4o database.

Listing 5 - Retrieve Objects from a db4o Database 
 
package tutorial.db4o

import com.db4o.Db4oEmbedded
import Adapter._

object ReadProgrammers extends App {
    // a connection to the tutorial (db4o) database
    val connection = Db4oEmbedded.openFile("tutorial.db4o")
    
    // Retrieve all programmers from the database
    val rs = connection.query{programmer: Programmer => true}
    
    // Print out each programmer's name and phone number
    rs.foreach{programmer =>
        println("Programmer name: %s, phone number: %s".format(programmer.name, programmer.phone))
    }
    
    connection.close()
}

If we run the program in Listing 5 without running the program in Listing 4 before, it prints nothing, because there is no programmer object in the database. If we run the program in Listing 4, then run the program in Listing 5, it will print:

Programmer name: Joe, phone number: 513-536-8093
Programmer name: Bob, phone number: 513-376-2521
Programmer name: Steve, phone number: 513-206-3276

Updating Objects in db4o

In Listing 6 is a Scala program that at first retrieves programmer objects with name "Joe" from the db4o database, and changes their phone number from whatever to 513-111-1111.  

Listing 6 - Update Objects in a db4o Database

package tutorial.db4o

import com.db4o.Db4oEmbedded
import Adapter._

object UpdateProgrammers extends App {
    // a connection to the tutorial (db4o) database
    val connection = Db4oEmbedded.openFile("tutorial.db4o")
    
    // Retrieve programmers with name "Joe" from the database
    val rs = connection.query{programmer: Programmer => programmer.name == "Joe"}
    
    // Change the programs' phone number
    rs.foreach{programmer =>
        programmer.phone = "513-111-1111"
        connection.store(programmer)
    }
    connection.commit()
    
    connection.close()
}
After we run this program, if we run the program in Listing 5 again, the output will be:

Programmer name: Joe, phone number: 513-111-1111 
Programmer name: Bob, phone number: 513-376-2521 
Programmer name: Steve, phone number: 513-206-3276 

We can see phone number of Joe has been updated.

In db4o, the method to store a brand new object and the method to store a updated object is exactly the same one.

Deleting Objects from db4o 

In Listing 7 is a Scala program that deletes every programmer objects in the database.

Listing 7 - Delete Objects from a db4o Database 

package tutorial.db4o

import com.db4o.Db4oEmbedded
import Adapter._

object DeleteProgrammers extends App {
    // a connection to the tutorial (db4o) database
    val connection = Db4oEmbedded.openFile("tutorial.db4o")
    
    // Retrieve all programmers from the database
    val rs = connection.query{programmer: Programmer => true}
    
    // delete every programmers
    rs.foreach{programmer =>
        connection.delete(programmer)
    }
    connection.commit()
    
    connection.close()
}

The Adapter

The magic to simplify the query method is an adapter class shown in Listing 8.  It is this class that has the query method that takes a predicate (i.e. a function returning a Boolean value) rather than an anonymous class extending the Predicate class. In the company object we also defined a implicit method that converts (i.e. wraps) an ObjectContainer into an Adapter object. With this implicit method, and a import statement import Adapter._, we will be able to call the new version of query method on an ObjectContainer object, as shown in Listing 5, 6, 7 (The compiler will do the conversion behind the scene). These are the real power of the Scala programming language.

Listing 8 - An Adapter Class

package tutorial.db4o

import com.db4o.ObjectContainer
import com.db4o.query.Predicate

class Adapter (connection: ObjectContainer) {
    def query[T](predicate: T => Boolean) : List[T] = {
        var results : List[T] = List[T]()
        val objectSet = connection.query(new Predicate[T]() {
            override
            def `match`(entry: T) = {
                predicate(entry)
            }
        });
        
        while (objectSet.hasNext()) {
            results = objectSet.next :: results
        }
        
        results
    }
}

object Adapter {
    implicit def objectContainer2Adapter(connection: ObjectContainer) = new Adapter(connection)
}

Conclusion 

We can use db4o in Scala programs. The functional programming nature of Scala greatly simplifies the query API. There are, however, some limitations on storing Scala objects in db4o databases. My experience shows that db4o does not support Scala collections. In other words, if a Scala class has Scala Map and Set as fields, db4o will not be able to store them correctly. I am going to discuss more details in this regard in my next post on this subject.

Sunday, November 11, 2012

Overriding hashCode() in Java May Cause Adverse Effects

One important method of the java.lang.Object class is hashCode(). It is a popular practice to override the hashCode() method in classes that extend the Object class (All Java classes, directly or indirectly extend the Object class). Joshua Block, in his popular book Effective Java, advices Java programmers to "always override hashCode when you override equals" (Item 8, Effective Java, Second Edition). Joshua, however, did not mention the possible adverse effect of overriding the hashCode() method. This article demonstrates such adverse effects in an example.

Our example is a short program that manages student-tutor relationship between students and tutors. Students are represented by objects of the Student class, in Listing 1. Tutors are represented by objects of the Tutor class, in Listing 2. The main program is in Listing 3.

Listing 1


package hashcode.issue;

public class Student {
    public String firstName;
    public String lastName;
    public String phoneNumber;
    
    public Student(String firstName, String lastName, String phoneNumber) {
        this.firstName = firstName;
        this.lastName = lastName;
        this.phoneNumber = phoneNumber;
    }
}

Listing 2

package hashcode.issue;

public class Tutor {
    public String firstName;
    public String lastName;
    public String phoneNumber;
    
    public Tutor(String firstName, String lastName, String phoneNumber) {
        this.firstName = firstName;
        this.lastName = lastName;
        this.phoneNumber = phoneNumber;
    }
}

Listing 3

package hashcode.issue;

import java.util.HashMap;
import java.util.Map;

public class HashCodeIssue {
    private static Map<Student, Tutor"> relationMap = new HashMap<Student, Tutor>();

    public static void main(String[] args) {
        Student john = new Student("John", "Jones", "8945");    // Create a Student object named john
        Tutor tom = new Tutor("Tom", "Petzold", "4627");    // Create a Tutor object named tom
        
        relate(john, tom);    // record the student-tutor relationship between john and tom
        
        // do many other things ...
        
        Tutor johnsTutor = findTutor(john);    // find the tutor of john
        if (johnsTutor != null) {    // print out what we found
            System.out.printf("John's tutor is %s %s\n", johnsTutor.firstName, johnsTutor.lastName);
        } else {
            System.out.println("John does not have a tutor.");
        }
        
        
        // John changed phone number
        john.phoneNumber = "513-326-5489";
        
        johnsTutor = findTutor(john);    // find the tutor of john again
        if (johnsTutor != null) { // print out what we found
            System.out.printf("John's tutor is %s %s\n", johnsTutor.firstName, johnsTutor.lastName);
        } else {
            System.out.println("John does not have a tutor.");
        }

    }
    
    private static void relate(Student student, Tutor tutor) {
        relationMap.put(student, tutor);
    }
    
    private static Tutor findTutor(Student student) {
        return relationMap.get(student);
    }
}

The program maintains the student-tutor relationship by a HashMap, using Student objects as map keys and Tutor objects as map values. A Student object is mutable. One can change a student's first name, last name, and phone number. After we establish a student-tutor relationship between a Student object john and a Tutor object tom by calling the relate() method, we call the findTutor() method to find the tutor of john. We found it. Then we change phone number of john, and call the findTutor() method again to find the tutor. We found the tutor again.

Program execution output:

John's tutor is Tom Petzold 

So far, so good.

Now we override the hashCode() method in the Student class, as in Listing 4 (Line 16 - 19). Then we run the program again. This time, the second call to the findTutor() method failed to find the tutor.

Program execution output:

John's tutor is Tom Petzold 
John does not have a tutor


Listing 4

package hashcode.issue;

import org.apache.commons.lang3.builder.HashCodeBuilder;

public class Student {
    public String firstName;
    public String lastName;
    public String phoneNumber;
    
    public Student(String firstName, String lastName, String phoneNumber) {
        this.firstName = firstName;
        this.lastName = lastName;
        this.phoneNumber = phoneNumber;
    }
    
    @Override
    public int hashCode() {
        return new HashCodeBuilder().append(firstName).append(lastName).append(phoneNumber).build();
    }
}

The failure is due to the fact that when we use a Student object as key in a HashMap, the map calls the hashCode() method on the Student object and uses the returned number to determine hash bucket where the corresponding value resides. In our case, we overrode the hashCode() method to return a  number that depends on value of the student's first name, last number, and phone number. When the student's phone number changes, so does its hash code.

The hashCode() method defined in the java.lang.Object class is different, it always return the same number for the same object. In other words, the returned hash code can be used as the object's identity. When we overrode the hashCode() method to return a number that depends on the object's state (in our example, the Student's first name, last name, and phone number), the hash code can no longer be used as the object's identity.

Conclusion
If an object is mutable and its hashCode() method returns a number depending on its state, do not use the object as hash map key.  In case that you want to use an object as hash map key, ensure at first that it is guaranteed that either the object is immutable or its hashCode() method will always return the same number.

Sunday, October 14, 2012

Deploying Scala Desktop Applications via Java Web Start

[Last update on 04/08/2013]

Java Web Start is a great technology to deploy Java applications. It can be used to deploy Scala applications as well. This tutorial shows how to do it.

The Example Application

Our example Scala application is a simple Scala Swing desktop GUI, shown as Listing 1. Compile it and package the produced class files in a jar file. Let's name the jar file scala-gui.jar. To compile and run it, we need two scala libraries: scala-library and scala-swing. In this tutorial, we use scala-library-2.9.2.jar and scala-swing-2.9.2.jar.

Listing 1 - The Example Application

package simple.scala.swing.gui

import scala.swing._

object HelloWorld extends SimpleGUIApplication {
    def top = new MainFrame {
        title = "Scala Swing"
        contents = new Label {
            text = "Hello World!"
        }
    }
}

When runs, the application shows a simple window with text "Hello World!" as its content, as in the figure below.

Figure 1 - Example Scala Application


Host Web Server

To deploy the Scala application via Java Web Start, we have to host it on a web server. In this tutorial, we use Tomcat as our web server.

In Tomcat, create a simple web application named scala-gui. The figure below shows the directory structure of the Tomcat home directory.

Figure 2 - Directory Structure of Tomcat Home


Library Jar Files

Sign scala-gui.jar, scala-library-2.9.2.jar, and scala-swing-2.9.2.jar with a private key. (If need, see the appendix later for the how-to). Copy the above three jar files to webapps/scala-gui/lib under the Tomcat home directory.

jnlp Files

Create two jnlp files - scala-gui.jnlp and lib.jnlp, and place them under webapps/scala-gui under the Tomcate home directory. Content of the two jnlp files are in Listing 2 & 3. The IP of our web server is 192.168.241.128.

Listing 2 - scala-gui.jnlp

<?xml version="1.0" encoding="utf-8"?>
<jnlp spec="1.0+"
    codebase="http://192.168.241.128/scala-gui/"
    href="scala-gui.jnlp">
    <information>
          <title>Scala GUI</title>
          <vendor>xxx</vendor>
          <homepage href="http://192.168.241.128/scala-gui/" />
          <description>A simple Scala Swing GUI application to demo Web Start Deployment</description>
    </information>

    <security>
        <all-permissions />
    </security>

    <resources>
        <jar href="lib/scala-gui.jar" />
        <extension href="lib.jnlp"/>
    </resources>
    
    <application-desc main-class="simple.scala.swing.gui.HelloWorld" />
</jnlp>
 
 
Listing 3 - lib.jnlp 

<?xml version="1.0" encoding="utf-8"?>
<jnlp spec="1.0+"
    codebase="http://192.168.241.128/scala-gui/"
    href="lib.jnlp">
    <information>
          <title>Scala GUI Library</title>
          <vendor>scala.org</vendor>
          <homepage href="http://192.168.241.128/scala-gui/" />
          <description>Scala language and Swing libraries</description>
    </information>

    <security>
        <all-permissions />
    </security>
    
    <resources>
        <jar href="lib/scala-library-2.9.2.jar" />
    </resources>
    
    <resources>
        <jar href="lib/scala-swing-2.9.2.jar" />
    </resources>

    <component-desc/>
</jnlp>

The Web Page 

Finally, create our web page for users to download the Scala application. It is a simple HTML file, as shown in Listing 4.  

Listing 4 - index.html 

<!DOCTYPE html>
<html lang="en">
    <head>
        <meta charset="utf-8">
        <title>Scala GUI</title>
        
        <script src="http://www.java.com/js/deployJava.js"></script>
    </head>
    
    <body>
      <H1>Scala GUI</H1>
  
  Click this button to start the Scala GUI:
  <script>
                 var url = "http://192.168.241.128/scala-gui/scala-gui.jnlp";
          deployJava.createWebStartLaunchButtonEx(url, '1.7.0');
  </script>
    </body>
</html>


The web page will be shown in a web browser as in the figure below.

Figure 3 - Download Page of the Applicatio

When a user click the Launch button on the web page, if Java Web Start has been installed on the client machine, a dialog as in the figure below will be shown to the user.

Figure 4 - Open JNLP with Java Web Start


If the user takes the default option, i.e. "Open with Java(TM) Web Start Launcher", a Security Warning dialog will be shown next, as in Figure 5. It is because we signed the jar files with a self-signed certificate. If we had signed the jar files with a certificate signed by a certificate authority trusted by the user, there would not be such warning. If the user accept the unverified signature, Java Web Start will download the Scala application and run it on the user's machine, as shown in Figure 1.

Figure 5 - Security Warning

Troubleshooting

Java Web Start may log/trace many useful information that can be used to troubleshoot deployment problems.

To enable Java Web Start log/trace on a Windows machine, do the following:

  1. Go to the Control Panel, and click the Java Control Panel. On the Java Control Panel dialog, choose the Advanced tab. Under Setting / Debugging, check both Enable tracing and Enable logging, as shown in Figure 6.
  2. Find the deployment.properties file. (On a Windows 7 machine, it is under C:\users\${username}\AppData\LocalLow\Sun\Java\Deployment, where ${username} should be replaced by concrete username.) Make sure the deployment.properties file has the following configuration lines:
    • deployment.trace=true
    • deployment.trace.level=all

Figure 6 - Java Control Panel    


On a Windows 7 machine, the log and trace files can be found under C:\users\${username}\AppData\LocalLow\Sun\Java\Deployment\log.


Appendix - Using Java keytool & jarsigner


Generate Keys

The example below shows how to generate keys using Java keytool.

keytool -genkey -alias tedkey -keypass tedpass -dname "cn=Ted Gao, ou=, o=, l=Mason, s=Ohio, c=US" -keystore C:\web-start-tutorial\ted.keystore -storepass tedpass -validity 1825 -keyalg RSA -keysize 2048 -storetype JCEKS -v

The command above has to be in one line. It generates a pair of RSA private key and certificate with 2048 bit strength, and stores them in a keystore file named ted.keystore under C:\web-start-tutorial. Alias for this key pair is "tedkey". The alias is to be used to specify which key (pair) to use later. The keystore and the private key are protected with a password "tedpass". The password for the private key is required to read the private key; the password for the keystore is required to write to the keystore. They do not have to be the same password. In this example, we just use the same password for both.

Sign  Jars

The example below shows how to sign java files using Java jarsigner.

jarsigner -keystore C:\web-start-tutorial\ted.keystore -storepass tedpass -keypass tedpass -storetype JCEKS -verbose scala-gui.jar tedkey

The command above has to be in one line. It use a keystore named ted.keystore under C:\web-start-tutorial. Alias of the key to use is "tedkey". Both the private key and the keystore are protected by password "tedpass". The example above signs a jar file named scala-gui.jar.