It will cost much less in time to vary web pages via Greasemonky scripts than changing JSP pages, servlets, etc. Besides, if the changes are done in JSP pages, servlets, etc. just to check our tests, we have to undo the changes aftermath.It will cost additional development time.
Greasemonky is a Firefox add-on. Greasemonky user scripts are JavaScripts. This article uses Greasemonky 0,9,8 in Firefox 5.0.1 as example.
Once Greasemonky is installed into Firefox, a Greasemonky icon will appear at the upper-right corner of the browser. Clicking the button beside the icon will pop up a menu with the following items:
- Enabled (to enable or disable Greasemonky)
- Manage user scripts …
- New user script …
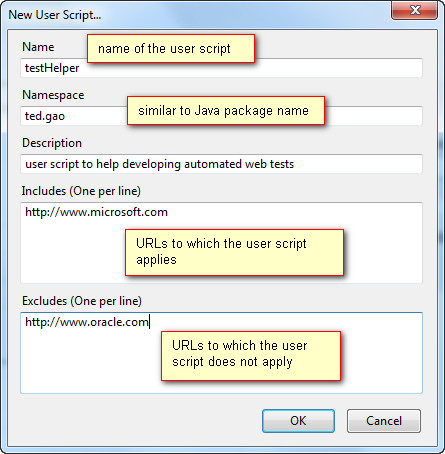
To create a new user script, select the menu item “New user scripts…” from the Greasemonky menu. A New User Script… dialog will pop up. Fill it and click the OK button.
To manage existing user scripts, select the menu item “Manage user scripts …”. It will start a browser tab with all existing user scripts listed on it. One can disable or remove a particular user script by clicking the Disable or Remove button for that user script. To edit a user script, right click the item representing it on the tab and select menu item Show container folder from the context menu. It will bring in a Windows Explorer window with the user script in the opened folder. In our example, the user script is named testHelper and the script file name will be given by Greasemonky as testhelpr.user.script. One can open the script file with any text editor and edit it.
In our example, our script is as below.
// ==UserScript==
// @name testHelper
// @namespace ted.gao
// @description jQuery script to help automated web testing
// @include http://www.google.com/
// @require http://ajax.googleapis.com/ajax/libs/jquery/1.6.2/jquery.min.js
// ==/UserScript==
$("html body div#mngb div#gb div#gbw div#gbz ol.gbtc li.gbt a#gb_2.gbzt span.gbts").text("Pictures");
$("html body div#searchform.jhp form#tsf div.tsf-p div.jsb center input").remove()
What between the // ==UserScript== and // ==/UserScript== lines are Greasemonky metadata block. What after the // ==/UserScript== line are ordinary JavaScript. In our case, the JavaScripts are two jQuery statements. To enable jQuery in Greasemonky, one only needs to have the metadata line
// @require http://ajax.googleapis.com/ajax/libs/jquery/1.6.2/jquery.min.js
With the user script testHelper as in the example above, when we visit Google home page, the page will be altered as shown here.
 |
Original Google Home Page |
 |
Altered |
1 comment:
Btree
Btree
Btree
Btree
Post a Comment